Wonders never cease with the almighty rice cooker. Besides producing fluffy, perfectly cooked rice every time, our rice cookers can do so much more. Take one of our first Simple Stay-home recipes, the One-pot Chicken & Mushroom Rice—a tasty upgrade to your normal serving of white rice. Or if you have a sweet tooth, then the Rice Cooker Matcha Cake Under 30 Mins demonstrates just how versatile our rice cooker can be.
Truly, our rice cooker is the gift that keeps on giving. After perusing the wealth of rice cooker recipes, it turns out you can also make bread in your rice cooker. Given that sourdough is all the rage these days, making rice cooker bread seemed like an easier and faster way to make bread. As a bona fide bread lover, I knew I had to try this recipe out.
I was largely inspired by this recipe I found on YouTube and found that this works better if your rice cooker has a cake or bake function.

Ingredients
- 300g of bread flour + handful of flour for dusting
- 30g of sugar
- 4g of active dry yeast
- 200ml of water
- 15ml of vegetable oil or any neutral oil
Tools
- Kitchen scale
- Bowl
- Spatula
- Rice cooker
- Brush
Recipe Preparation
Preparation time: 20 minutes; Proofing time: 75 minutes; Cooking time: 25 minutes on bread function or 50 minutes on rice function
Feeds two
- Measure out 200ml of lukewarm water and pour in 30g of sugar.
- Next, pour in active dry yeast into the water.
- You should notice some foaming and the mild alcohol-like smell coming from the water. If nothing happens, either your yeast is dead or the water is too hot.
- Measure out flour and vegetable oil and set them aside.
- Then, mix water and flour together until it forms a shaggy dough.
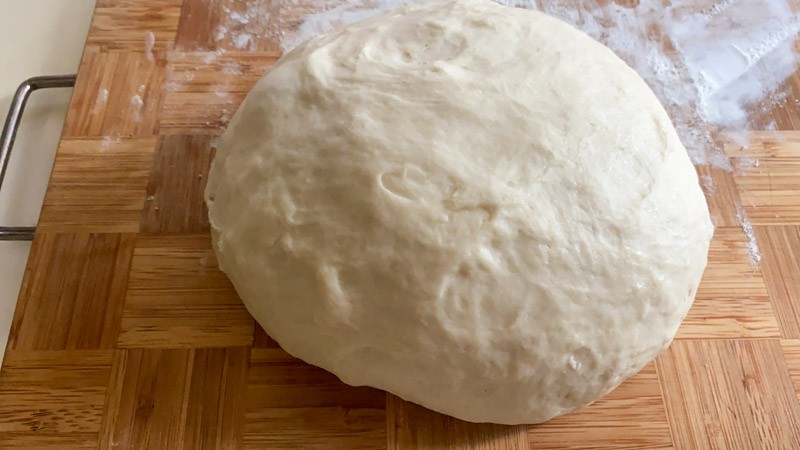
- Place your dough on a lightly floured surface and knead for 10 minutes
- Slowly incorporate the vegetable oil as you knead the dough, continue kneading until the dough is smooth and elastic.
- Shape your dough into a ball. Let your dough proof, covered, in a warm spot for 45 minutes.
- After 45 minutes, gently knead to the dough to punch out all the air.
- Divide the dough into roughly 12 dough balls.
- Then, lightly oil your rice cooker pot. Skip this step if your pot is non-stick.
- Place each dough ball into the rice cooker pot and let it proof for 30 minutes.
- Finally, set your rice cooker to the bake function for 25 minutes. If your rice cooker does not have a ‘bake’ function, set it on the rice function and let it cook for 50 minutes.
- When the timer is up, you may flip the bread over and cook for an addition 5 – 10 minutes if you want the top side of the bread to develop a nice toasty brown.
- Remove from rice cooker and serve.
Recipe (In Pictures)
Step 1: Measure out 200ml of lukewarm water and pour in 30g of sugar.
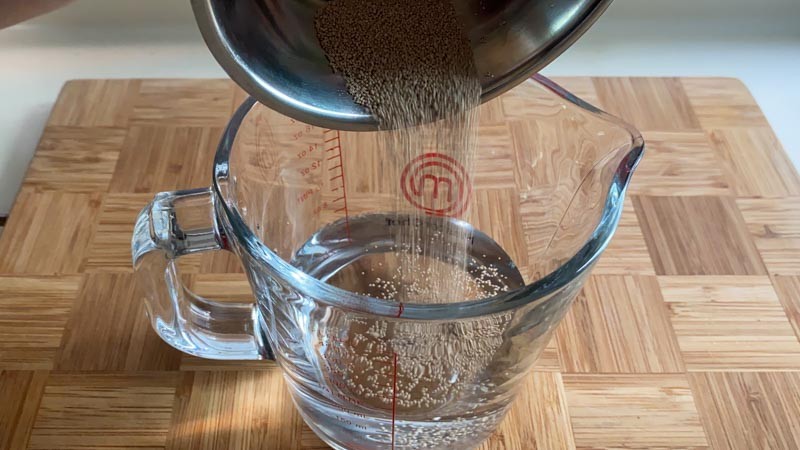
Step 2: Next, pour in the active dry yeast into the water. There are different kinds of yeast that you can find on the shelves, like instant yeast and active dry yeast. They are very different and require different measurements, so make sure you buy the right one.

You should notice some foaming and the mild alcohol like smell coming from the water. If nothing happens, either your yeast is dead or the water is too hot, so just throw out the water and begin again.
Step 3: Measure out the flour and vegetable oil, and set them aside.
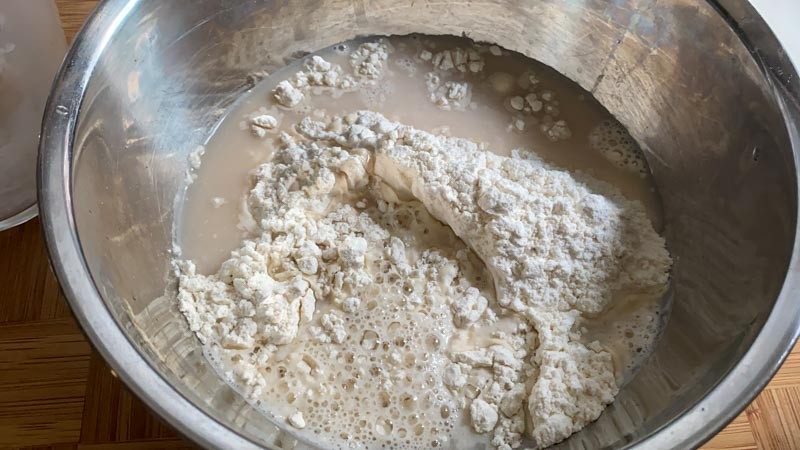

Step 4: Then, mix the water and the flour together until it forms a shaggy dough.

Step 5: Pour the dough out on a lightly-floured surface and knead for 10 minutes. You may add more flour if the dough is still too sticky.
Make sure you knead for the full 10 minutes—that activates the gluten and gives it that chewy, stretchy texture. I find that setting a timer on your phone usually helps with this process. If the dough keeps pulling back, let the dough rest for 5 minutes continue kneading.

Step 6: As you knead, slowly incorporate the vegetable oil into the dough.
It might seem like a sticky mess at the beginning but keep working the dough and it soon becomes smooth and elastic.

You’ll know it’s done when you poke the dough and springs back slowly.
Step 7: Let your dough proof covered in a warm spot for 45 minutes or until it has doubled in size. It would be very airy and puffy at this point.
Step 8: After 45 minutes gently knead to the dough to punch out all the air.


Step 9: Divide the dough into roughly 12 dough balls.
Step 10: Then, lightly oil the rice cooker pot. Skip this step if your pot is non-stick.

Step 11: Place each dough ball into the rice cooker pot and let it proof for 30 minutes.
Step 12: Finally, set your rice cooker to the ‘bake’ function for 25 minutes. If your rice cooker does not have a ‘bake’ function, set it on the ‘rice’ function and let it cook for 50 minutes.
Step 13: When the timer is up, you may flip the bread over and cook for an addition 5 – 10 minutes if you want the top side of the bread to develop a nice toasty brown.

Finally, remove from rice cooker and serve. The texture of the bread was soft but not as soft as the other videos I’ve seen. I reckon the reason was that my rice cooker pot was stainless steel so the bread had a crispy bottom instead of pillowy soft.

I did like the taste of the bread as it was soft (though, it could have been softer) and sweet like most Asian style bread. Not to mention, it had a certain nostalgic element to it.
A quick and easy recipe with ingredients that can be easily found in your pantry, save for yeast unless you are one of those CB bakers that bakers bread all the time. Not to worry, you can easily find some baking ingredients on Shopee.
Expected damage: S$2 – S$3 per portion